Thunar - The File Manager Window
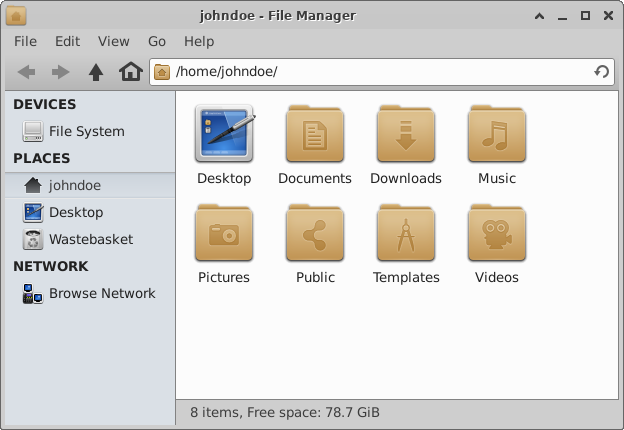
By default, the file manager window consists of a Side Pane on the left, the Main Area on the right and a Location Selector above the main area.
| The File Manager Window |
|---|

|
Side Pane
The Side Pane is organized into three categories of objects: Devices, Places and Network.
In the Devices section, you will find fixed disk partitions as well as removable media listed. At a minimum, on a simple system with a single disk and operating system, you will just see the File System listed. Clicking on this item will take you to the root of your file system and display the entire folder hierarchy. If you are new to Linux, this structure may be confusing. You can learn more about it in The UNIX File System section.
The Places section provides a location for storing shortcuts to the various file folders on your system. The three shortcuts shown in the figure above are there by default and they can not be removed or rearranged. The first shortcut will lead to your Home Folder, the folder where you store all your personal data, and will therefore have the name of the current user. The second shortcut takes you to the Desktop Folder, which contains the files and folders that are displayed on the desktop. The third shortcut will take you to the trah bin, which stores deleted files that can be recovered later. You can add your own shortcuts by simply dragging folders from the main area to the Side Pane. This will allow you to access important folders quickly. User-defined shortcuts can be rearranged in the side pane by dragging them up or down in the list. To remove a previously added shortcut, right-click on the shortcut and choose Remove Shortcut. To rename a previously added shortcut, right-click on the shortcut and choose Rename Shortcut. Note that these actions affect only the shortcut, not the folder referenced by the shortcuts.
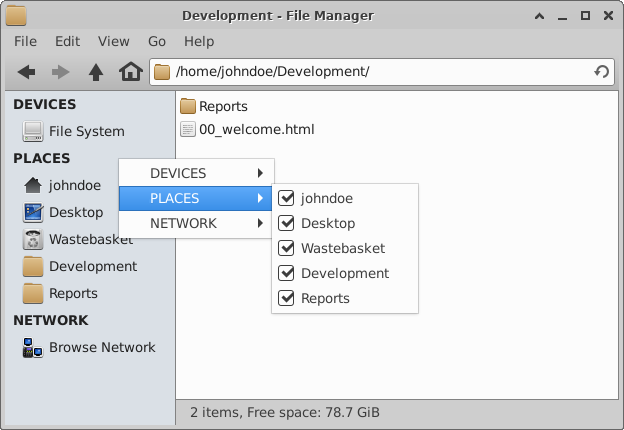
If your Side Pane starts to get too cluttered with devices and shortcuts, you can temporarily hide items be right-clicking on an empty area of the pane and unchecking the ones you don't need to see.
| Show/Hide Side Pane Items |
|---|
 |
In the Network section, you will see a single Browse Network icon. Clicking this icon will allow you to connect to a server or network share to browse and view files on that server. The file manager will find any computers on your local area network that advertise their ability to serve files. If you want to connect to a server on the internet, or if you do not see the computer you're looking for, you can manually connect to a server by typing in its internet/network address in the toolbar of the Location Selector. After successfully connecting to a share, a shortcut for it will appear under Network in the side pane.
If you prefer the classic tree view of the file system, that option is available by selecting View → Side Pane → Tree. As you might expect, shortcuts are not available in this view.
Main Area
The Main Area will always display the contents of the current folder. Double-click on folders to enter them and right-click on files or folders to bring up a context menu offering additional options for them. Select multiple files or folders by using the standard Shift-click or Ctrl-click method (for contiguous and non-contiguous items respectively). An alternate method for selecting contiguous items is to drag a rectangle over them with the mouse.
By default, a status bar is shown at the bottom of the Main Area which displays the number of items in the current folder as well as the free space on the current partition.
If you prefer a list view instead of icons, you can switch by choosing View → View as Detailed List.
| Side Pane in Tree View - Main Window as Detailed List |
|---|

|
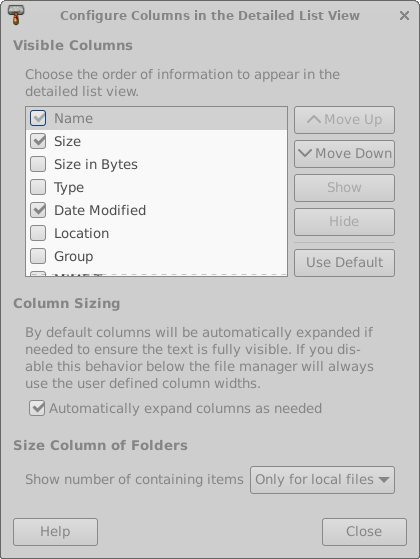
When in Detailed List mode, you have the option of configuring which columns are visible by selecting View → Configure Columns... from the main menu.
| Visible Columns in the Detailed List View |
|---|

|
- Visible Columns
- Select the columns you want to be displayed from the list of available columns. Click Move Up or Move Down to change the order of the columns. Click Use Default to revert your changes.
- Column Sizing
- Select the option Automatically expand columns as needed if you want the list view columns to expand automatically if needed to ensure the text is fully visible.
Location Selector
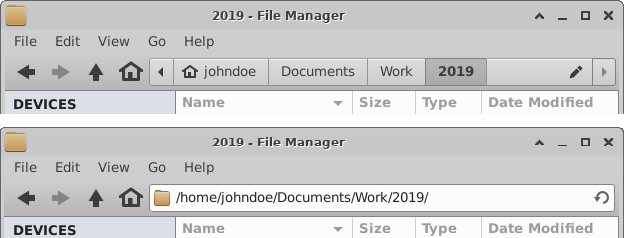
The Location Selector shows the path to the current folder starting from the root directory (or the URL in the case of a network share). The path can be displayed in either a Pathbar or Toolbar style by clicking View → Location Selector from the menu.
| Location Selector Style Options |
|---|

|
Each style gives a slightly different visual indication of where your current folder is in the file hierarchy and offers different methods for navigating through the file system. In the case of the Pathbar Style, you can quickly relocate to any folder by clicking on its button. Right-clicking on a button offers additional options. In both styles you can move one level at a time by clicking on the Back, Forward or Up arrow icons but if you right-click on the Back and Forward icons, you will see a pull-down history of previously visited folders to select from. The Home icon will always take you directly to your Home folder.
Clicking the “edit” pencil at the Pathbar Style will temporary transform it into Toolbar Style, so that you can copy/paste the path.
See the File Management Preferences section for additional customization options.
