Table of Contents
Custom Actions
Thunar allows users to add custom actions to the file and folder context menus (by the use of the thunar-uca plugin, part of the Thunar distribution, in the plugins/ subdirectory). You can set up new actions in the Custom Actions dialog, available via the Configure custom actions... item in the Edit menu.
This page serves as an introduction to the Custom Actions plugin, and includes a list of useful examples.
Adding a Custom Action
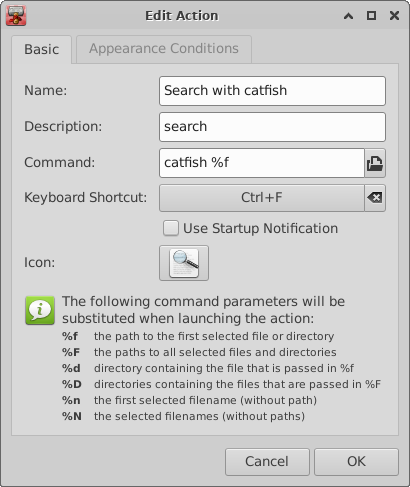
This section provides a step-by-step introduction to the Custom Actions plugin, demonstrating how to add a Print File action, which uses xfprint to print text files. We start by opening the Custom Actions dialog as explained above. In the dialog, click on the first button in the list of buttons (the one labeled with the +). The Create Action dialog will appear, as shown in the screenshot below.
| Create Action Dialog |
|---|

|
On the first page, enter Search with Catfish in Name: and search in Description: Enter catfish %f for the Command: (the %f will be replaced with the path to the selected file, as explained in the dialog), and select an icon by clicking Icon: (in the screenshot the system-search.svg icon was used).
Now, continue with the second page (the Appearance Conditions page).
We want to create an action that is only applicable to folders, so select the Folders options and unselect the options for the other file types. Next you can specify a File Pattern to display the action only for text files that match a certain pattern. In the example, we set the file pattern to * (which matches all filenames) to indicate that the action should be displayed for all folders.
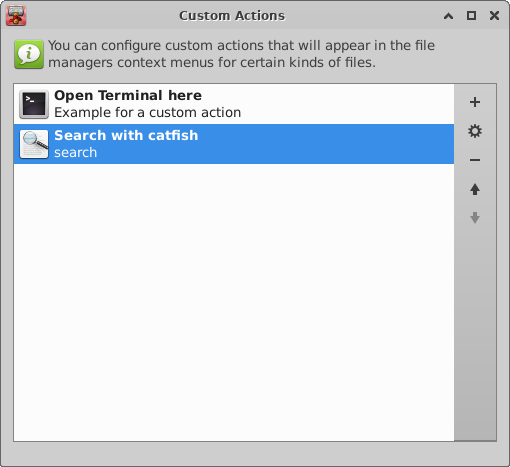
That's all. Click OK to close the Create Action dialog. The new action, labeled Search with Catfish will appear in the Custom Actions list.
Now close the Custom Actions dialog, select a folder in Thunar and open the context menu (right-click on the file icon). The newly created Search with Catfish action will appear in the context menu, as shown in the screenshot below.
| Custom Actions Dialog |
|---|

|
Use mnemonics to open Thunar Custom Actions
When you create a Thunar Custom Action you can set the name with an underscore “_” before a letter to use it as mnemonic. When you right click in a Thunar view, you can type the letter to access your custom action.
Examples
Here are a few useful examples of custom actions. Feel free to extend this list.
Finding files in the current folder with gnome-search-tool
- Name: Search…
- Command:
gnome-search-tool –path=%f - File pattern: *
- Appears if selection contains: Directories
Note: For this action, you'll need to have gnome-search-tool installed, which is part of the gnome-utils package. This program also has a lot of other nice command-line options which you could use to create even more specialized actions.
Finding files inside the current/selected folder with catfish
- Name: Search files inside…
- Command:
catfish %f - File pattern: *
- Appears if selection contains: Directories
Note: For this action, you'll need to have catfish installed, which is part of the catfish package.
Working with archives (tar, gzip, etc)
- Name: Extract here (bzip2)
- Command:
tar xjf %n - File pattern: *.tar.bz2;*.tbz2
- Appears if selection contains: Other Files
- Name: Extract here (zip)
- Command:
unzip %f - File pattern: *.zip
- Appears if selection contains: Other Files
- Name: Create tar.gz from folder
- Command:
tar czvf %n.tar.gz %n - File pattern: *
- Appears if selection contains: Directories
Hint: You may prefer the Thunar Archive Plugin, which does pretty much the same thing with less manual setup required on your part. It's either included with your distribution (in the case of Xubuntu), or available as a separate package (thunar-archive-plugin in Debian Etch). You might also need the xarchiver or “squeeze” package for things to work quite right.
Playing music files
- Name: Play with XMMS
- Command:
xmms %F - File pattern: *
- Appears if selection contains: Directories, Audio Files
- Name: Enqueue in XMMS
- Command:
xmms -e %F - File pattern: *
- Appears if selection contains: Directories, Audio Files
Hint: Works exactly the same with Audacious.
Burning an ISO file to a CD
- Name: Burn with K3B
- Command:
k3b --cdimage %f - File pattern: *.iso
- Appears if selection contains: Other Files
Viewing images
- Name: View with GQview
- Command:
gqview %f - File pattern: *
- Appears if selection contains: Directories, Image Files
Note: This tip also works just as well with GThumb
Converting PNGs to JPEGs
- Name: To JPEG
- Command:
convert %f -quality 75 %f.jpg - File pattern: *.png
- Appears if selection contains: Image Files
Hint: `basename %f .png`.jpg (be careful–those are backticks) will strip the old .png extension off of the original filename.
Losslessly Rotating JPEGs
- Name: Rotate Clockwise
- Command:
for file in %F; do tempfile=$(mktemp); (jpegtran -copy all -rotate 90 $file > $tempfile); mv -f $tempfile $file; rm -f $tempfile; done - File pattern: *.jpg;*.JPG;*.jpeg;*.JPEG
- Appears if selection contains: JPEG Image Files
Note: jpegtran is available as part of the libjpeg or libjpeg-progs packages of most distributions. Unlike using “convert”, the complicated loop structure is necessary with “jpegtran”: “jpegtran -rotate 90 -outfile %F %F” will produce a 0kb file.
Here an example how rotation can be scripted with “convert”.
Opening a terminal
- Name: Open in a terminal
- Command:
terminal --default-working-directory=%d - File pattern: *
- Appears if selection contains: Directories
Note: You might need to type xfce4-terminal instead of just terminal for some distributions.
Opening a root terminal
- Name: Open a root terminal here
- Command:
gksu “xfce4-terminal –default-working-directory=%f” - File pattern: *
- Appears if selection contains: Directories
Note: You should rewrite the command with normal straight quotes.
Opening a root Thunar
- Name: Open a root Thunar here
- Command:
gksu thunar %f - File pattern: *
- Appears if selection contains: Directories
Note: Some distributions no longer include gksu. Use pkexec instead.
Editing as root
- Name: Edit as root
- Command:
gksu put-your-favourite-text-editor-here %f - File pattern: *
- Appears if selection contains: Text files
Note: You'll need to replace put-your-favourite-text-editor-here with your favourite text editor (e.g. mousepad or geany). Also, see previous note about gksu.
Creating a symbolic link
- Name: Create symlink
- Command:
ln -s %f “%n (symlink)” - File pattern: *
- Appears if selection contains: Directories, other files
Saving the selected file/folder's pathname to the clipboard
For fans of the Windows “SendTo Extensions” power toy. This tip requires the xclip program, which you may need to install using your distribution's package manager.
- Name: Copy Pathname to Clipboard
- Description: Copies file's full pathname to the X PRIMARY selection
- Command:
echo -n %f | xclip -i - File pattern: *
- Appears if selection contains: any
Setting an image as the desktop background
- Name: Set as desktop background
- Command:
xfconf-query -c xfce4-desktop -p /backdrop/screen0/monitor0/image-path -s %f
- File pattern: *
- Appears if selection contains: Image Files
Viewing the disk usage of the current directory
- Name: Disk Usage
- Command:
baobab %d - File pattern: *
- Appears if selection contains: Tick all the boxes
Note: The idea is to get a visual picture of the current directory and any subdirectories. You could also use fsview or filelight, but the visuals are crisper in baobab.
Using 'nano' text editor in a terminal
- Name: Open in Terminal
- Command: xfce4-terminal -x nano %f
- File pattern: *
- Appearance Conditions: Text files
Since nano isn't a GUI app, you must start it in a terminal window.
Comparing selected files/directories
- Name: Compare
- Command:
meld %F - File pattern: *
- Appears if selection contains: Directories and Text files
Note: You will need the meld package.
Changing OpenDocument-supported formats
Note: You will need unoconv package for all following actions.
- Name: Convert to ODT
- Command:
unoconv -f odt %F - File pattern: *.doc;*.docx
- Appears if selection contains: Other files
- Name: Export to PDF
- Command:
unoconv -f pdf %F - File pattern: *.doc;*.docx;*.odt;*.odp;*.pps;*.ppt;*.xls;*.xlsx;*.ods;*.pptx
- Appears if selection contains: Other files
You can go on, try man unoconv for details.
Download subtitles with periscope
- Name: Download subtitles
- Command:
periscope -l en %F && zenity –info –title “Done” –text “Subtitles downloaded successfully” || zenity –error –title “Error” –text “Subtitles not downloaded successfully” - File pattern: *
- Appears if selection contains: Video Files
Note: You will need python-periscope package. Get it here. You'll also need zenity package. This command will try to get the English subtitles, change -l en to something else (fr, de, pt-br, …). You should rewrite the command with normal straight quotes.
Rename subtitles easily
- Name: Rename subtitles
- Description: Select video and subtitles file. Subtiles will be reanmed based on the video name.
- Command:
subrnm %F - File pattern: *.avi;*.mp4;*.crdownload;*.srt;*.sub
- Appears if selection contains: Video Files, Text Files, Other Files
Note: You will need subrnm script. Get it here. You'll also need zenity package.
Move files into a new folder
- Name: Move into new folder
- Description: Select any number of file/folders. A dialog will popup in which you can write the name of a new folder to create. Selected Files will be moved there.
- Command: NEW_FOLDER=$(/usr/bin/zenity –entry –title “Move into new folder” –text “Please enter a name for the new folder”); mkdir $NEW_FOLDER; mv %F $NEW_FOLDER
- File pattern: *
- Appears if selection contains: All
Note: You'll will need the zenity package.